


本頁面主要說明 Bun 原生的 Bun.serve API。Bun 也實作了 fetch 以及 Node.js 的 http 和 https 模組。
這些模組已經過重新實作,以使用 Bun 快速的內部 HTTP 基礎架構。您可以直接使用這些模組;像是 Express 這類依賴這些模組的框架應該也能直接運作。如需更詳細的相容性資訊,請參閱執行階段 > Node.js API 章節。
若要使用簡潔的 API 啟動高效能的 HTTP 伺服器,建議的方法是 Bun.serve。
Bun.serve()
使用 Bun.serve 在 Bun 中啟動 HTTP 伺服器。
Bun.serve({
  // `routes` requires Bun v1.2.3+
  routes: {
    // Static routes
    "/api/status": new Response("OK"),

    // Dynamic routes
    "/users/:id": req => {
      return new Response(`Hello User ${req.params.id}!`);
    },

    // Per-HTTP method handlers
    "/api/posts": {
      GET: () => new Response("List posts"),
      POST: async req => {
        const body = await req.json();
        return Response.json({ created: true, ...body });
      },
    },

    // Wildcard route for all routes that start with "/api/" and aren't otherwise matched
    "/api/*": Response.json({ message: "Not found" }, { status: 404 }),

    // Redirect from /blog/hello to /blog/hello/world
    "/blog/hello": Response.redirect("/blog/hello/world"),

    // Serve a file by buffering it in memory
    "/favicon.ico": new Response(await Bun.file("./favicon.ico").bytes(), {
      headers: {
        "Content-Type": "image/x-icon",
      },
    }),
  },

  // (optional) fallback for unmatched routes:
  // Required if Bun's version < 1.2.3
  fetch(req) {
    return new Response("Not Found", { status: 404 });
  },
});
路由
Bun.serve() 中的路由會接收 BunRequest(擴展自 Request),並傳回 Response 或 Promise<Response>。這讓發送和接收 HTTP 請求都能更輕鬆地使用相同的程式碼。
// Simplified for brevity
interface BunRequest<T extends string> extends Request {
  params: Record<T, string>;
}
路由中的 Async/await
您可以在路由處理常式中使用 async/await 來傳回 Promise<Response>。
import { sql, serve } from "bun";

serve({
  port: 3001,
  routes: {
    "/api/version": async () => {
      const [version] = await sql`SELECT version()`;
      return Response.json(version);
    },
  },
});
路由中的 Promise
您也可以從路由處理常式傳回 Promise<Response>。
import { sql, serve } from "bun";

serve({
  routes: {
    "/api/version": () => {
      return new Promise(resolve => {
        setTimeout(async () => {
          const [version] = await sql`SELECT version()`;
          resolve(Response.json(version));
        }, 100);
      });
    },
  },
});
型別安全的路由參數
當以字串字面值傳遞路由參數時,TypeScript 會解析這些參數,讓您的編輯器在存取 request.params 時顯示自動完成建議。
import type { BunRequest } from "bun";

Bun.serve({
  routes: {
    // TypeScript knows the shape of params when passed as a string literal
    "/orgs/:orgId/repos/:repoId": req => {
      const { orgId, repoId } = req.params;
      return Response.json({ orgId, repoId });
    },

    "/orgs/:orgId/repos/:repoId/settings": (
      // optional: you can explicitly pass a type to BunRequest:
      req: BunRequest<"/orgs/:orgId/repos/:repoId/settings">,
    ) => {
      const { orgId, repoId } = req.params;
      return Response.json({ orgId, repoId });
    },
  },
});
百分比編碼的路由參數值會自動解碼。支援 Unicode 字元。無效的 Unicode 字元會被替換為 Unicode 替換字元 &0xFFFD;。
靜態回應
路由也可以是 Response 物件(不需處理函式)。Bun.serve() 針對零分配調度進行了最佳化,非常適合用於健康檢查、重新導向和固定內容。
Bun.serve({
  routes: {
    // Health checks
    "/health": new Response("OK"),
    "/ready": new Response("Ready", {
      headers: {
        // Pass custom headers
        "X-Ready": "1",
      },
    }),

    // Redirects
    "/blog": Response.redirect("https://bun.dev.org.tw/blog"),

    // API responses
    "/api/config": Response.json({
      version: "1.0.0",
      env: "production",
    }),
  },
});
靜態回應在初始化後不會分配額外的記憶體。通常,相較於手動傳回 Response 物件,您可以預期至少有 15% 的效能提升。
靜態路由回應會快取在伺服器物件的生命週期內。若要重新載入靜態路由,請呼叫 server.reload(options)。
const server = Bun.serve({
  static: {
    "/api/time": new Response(new Date().toISOString()),
  },

  fetch(req) {
    return new Response("404!");
  },
});

// Update the time every second.
setInterval(() => {
  server.reload({
    static: {
      "/api/time": new Response(new Date().toISOString()),
    },

    fetch(req) {
      return new Response("404!");
    },
  });
}, 1000);
重新載入路由只會影響下一個請求。進行中的請求會繼續使用舊的路由。在完成舊路由的進行中請求後,舊路由會從記憶體中釋放。
為了簡化錯誤處理,靜態路由不支援從 ReadableStream 或 AsyncIterator 串流回應主體。幸運的是,您仍然可以先在記憶體中緩衝回應
const time = await fetch("https://api.example.com/v1/data");
// Buffer the response in memory first.
const blob = await time.blob();

const server = Bun.serve({
  static: {
    "/api/data": new Response(blob),
  },

  fetch(req) {
    return new Response("404!");
  },
});
路由優先順序
路由會依照特定性順序進行比對
- 精確路由 (
/users/all) - 參數路由 (
/users/:id) - 萬用字元路由 (
/users/*) - 全域捕捉所有路由 (
/*)
Bun.serve({
  routes: {
    // Most specific first
    "/api/users/me": () => new Response("Current user"),
    "/api/users/:id": req => new Response(`User ${req.params.id}`),
    "/api/*": () => new Response("API catch-all"),
    "/*": () => new Response("Global catch-all"),
  },
});
依 HTTP 方法路由
路由處理常式可以依 HTTP 方法進行特製化
Bun.serve({
  routes: {
    "/api/posts": {
      // Different handlers per method
      GET: () => new Response("List posts"),
      POST: async req => {
        const post = await req.json();
        return Response.json({ id: crypto.randomUUID(), ...post });
      },
      PUT: async req => {
        const updates = await req.json();
        return Response.json({ updated: true, ...updates });
      },
      DELETE: () => new Response(null, { status: 204 }),
    },
  },
});
您可以傳遞以下任何方法
| 方法 | 使用案例範例 |
|---|---|
GET | 擷取資源 |
HEAD | 檢查資源是否存在 |
OPTIONS | 取得允許的 HTTP 方法 (CORS) |
DELETE | 刪除資源 |
PATCH | 更新資源 |
POST | 建立資源 |
PUT | 更新資源 |
當傳遞函式而非物件時,所有方法都會由該函式處理
const server = Bun.serve({
  routes: {
    "/api/version": () => Response.json({ version: "1.0.0" }),
  },
});

await fetch(new URL("/api/version", server.url));
await fetch(new URL("/api/version", server.url), { method: "PUT" });
// ... etc
熱路由重新載入
使用 server.reload() 更新路由,而無需重新啟動伺服器
const server = Bun.serve({
  routes: {
    "/api/version": () => Response.json({ version: "1.0.0" }),
  },
});

// Deploy new routes without downtime
server.reload({
  routes: {
    "/api/version": () => Response.json({ version: "2.0.0" }),
  },
});
錯誤處理
Bun 為路由提供結構化的錯誤處理
Bun.serve({
  routes: {
    // Errors are caught automatically
    "/api/risky": () => {
      throw new Error("Something went wrong");
    },
  },
  // Global error handler
  error(error) {
    console.error(error);
    return new Response(`Internal Error: ${error.message}`, {
      status: 500,
      headers: {
        "Content-Type": "text/plain",
      },
    });
  },
});
HTML 導入
若要新增用戶端單頁應用程式,您可以使用 HTML 導入
import myReactSinglePageApp from "./index.html";

Bun.serve({
  routes: {
    "/": myReactSinglePageApp,
  },
});
HTML 導入不僅僅是提供 HTML。它是一個全功能的前端打包器、轉譯器和工具組,使用 Bun 的 打包器、JavaScript 轉譯器和 CSS 解析器建構而成。
您可以使用它來建構功能完整的前端,包含 React、TypeScript、Tailwind CSS 等。請查看 /docs/bundler/fullstack 以深入瞭解。
實用範例:REST API
以下是一個基本的資料庫支援 REST API 範例,使用 Bun 的路由器且沒有任何依賴項
import type { Post } from "./types.ts";
import { Database } from "bun:sqlite";

const db = new Database("posts.db");
db.exec(`
  CREATE TABLE IF NOT EXISTS posts (
    id TEXT PRIMARY KEY,
    title TEXT NOT NULL,
    content TEXT NOT NULL,
    created_at TEXT NOT NULL
  )
`);

Bun.serve({
  routes: {
    // List posts
    "/api/posts": {
      GET: () => {
        const posts = db.query("SELECT * FROM posts").all();
        return Response.json(posts);
      },

      // Create post
      POST: async req => {
        const post: Omit<Post, "id" | "created_at"> = await req.json();
        const id = crypto.randomUUID();

        db.query(
          `INSERT INTO posts (id, title, content, created_at)
           VALUES (?, ?, ?, ?)`,
        ).run(id, post.title, post.content, new Date().toISOString());

        return Response.json({ id, ...post }, { status: 201 });
      },
    },

    // Get post by ID
    "/api/posts/:id": req => {
      const post = db
        .query("SELECT * FROM posts WHERE id = ?")
        .get(req.params.id);

      if (!post) {
        return new Response("Not Found", { status: 404 });
      }

      return Response.json(post);
    },
  },

  error(error) {
    console.error(error);
    return new Response("Internal Server Error", { status: 500 });
  },
});
export interface Post {
  id: string;
  title: string;
  content: string;
  created_at: string;
}
路由效能
Bun.serve() 的路由器建立在 uWebSocket 的 樹狀結構方法之上,並加入 SIMD 加速的路由參數解碼和 JavaScriptCore 結構快取,以盡可能提升現代硬體的效能極限。
fetch 請求處理常式
fetch 處理常式會處理任何路由都未比對到的傳入請求。它會接收 Request 物件,並傳回 Response 或 Promise<Response>。
Bun.serve({
  fetch(req) {
    const url = new URL(req.url);
    if (url.pathname === "/") return new Response("Home page!");
    if (url.pathname === "/blog") return new Response("Blog!");
    return new Response("404!");
  },
});
fetch 處理常式支援 async/await
import { sleep, serve } from "bun";
serve({
  async fetch(req) {
    const start = performance.now();
    await sleep(10);
    const end = performance.now();
    return new Response(`Slept for ${end - start}ms`);
  },
});
也支援基於 Promise 的回應
Bun.serve({
  fetch(req) {
    // Forward the request to another server.
    return fetch("https://example.com");
  },
});
您也可以從 fetch 處理常式存取 Server 物件。它是傳遞給 fetch 函式的第二個引數。
// `server` is passed in as the second argument to `fetch`.
const server = Bun.serve({
  fetch(req, server) {
    const ip = server.requestIP(req);
    return new Response(`Your IP is ${ip}`);
  },
});
變更 port 和 hostname
若要設定伺服器將監聽的埠號和主機名稱,請在選項物件中設定 port 和 hostname。
Bun.serve({
  port: 8080, // defaults to $BUN_PORT, $PORT, $NODE_PORT otherwise 3000
  hostname: "mydomain.com", // defaults to "0.0.0.0"
  fetch(req) {
    return new Response("404!");
  },
});
若要隨機選取可用的埠號,請將 port 設定為 0。
const server = Bun.serve({
  port: 0, // random port
  fetch(req) {
    return new Response("404!");
  },
});

// server.port is the randomly selected port
console.log(server.port);
您可以透過存取伺服器物件上的 port 屬性,或存取 url 屬性來檢視選取的埠號。
console.log(server.port); // 3000
console.log(server.url); // https://127.0.0.1:3000
設定預設埠號
Bun 支援多種選項和環境變數來設定預設埠號。當未設定 port 選項時,會使用預設埠號。
--portCLI 旗標
bun --port=4002 server.tsBUN_PORT環境變數
BUN_PORT=4002 bun server.tsPORT環境變數
PORT=4002 bun server.tsNODE_PORT環境變數
NODE_PORT=4002 bun server.tsUnix 網域通訊端
若要監聽 unix 網域通訊端,請傳遞 unix 選項,並指定通訊端的路徑。
Bun.serve({
  unix: "/tmp/my-socket.sock", // path to socket
  fetch(req) {
    return new Response(`404!`);
  },
});
抽象命名空間通訊端
Bun 支援 Linux 抽象命名空間通訊端。若要使用抽象命名空間通訊端,請在 unix 路徑前加上空位元組。
Bun.serve({
  unix: "\0my-abstract-socket", // abstract namespace socket
  fetch(req) {
    return new Response(`404!`);
  },
});
與 Unix 網域通訊端不同,抽象命名空間通訊端不繫結到檔案系統,且在最後一個對通訊端的參照關閉時會自動移除。
錯誤處理
若要啟用開發模式,請設定 development: true。
Bun.serve({
  development: true,
  fetch(req) {
    throw new Error("woops!");
  },
});
在開發模式中,Bun 會在瀏覽器中顯示錯誤,並使用內建的錯誤頁面。

error 回呼
若要處理伺服器端錯誤,請實作 error 處理常式。此函式應傳回 Response,以便在發生錯誤時提供給用戶端。此回應將取代 Bun 在 development 模式中的預設錯誤頁面。
Bun.serve({
  fetch(req) {
    throw new Error("woops!");
  },
  error(error) {
    return new Response(`<pre>${error}\n${error.stack}</pre>`, {
      headers: {
        "Content-Type": "text/html",
      },
    });
  },
});
呼叫 Bun.serve 會傳回 Server 物件。若要停止伺服器,請呼叫 .stop() 方法。
const server = Bun.serve({
  fetch() {
    return new Response("Bun!");
  },
});

server.stop();
TLS
Bun 預設支援 TLS,由 BoringSSL 驅動。若要啟用 TLS,請傳入 key 和 cert 的值;兩者皆為啟用 TLS 所必需。
Bun.serve({
  fetch(req) {
    return new Response("Hello!!!");
  },

  tls: {
    key: Bun.file("./key.pem"),
    cert: Bun.file("./cert.pem"),
  }
});
key 和 cert 欄位預期的是 TLS 金鑰和憑證的「內容」,而不是路徑。這可以是字串、BunFile、TypedArray 或 Buffer。
Bun.serve({
  fetch() {},

  tls: {
    // BunFile
    key: Bun.file("./key.pem"),
    // Buffer
    key: fs.readFileSync("./key.pem"),
    // string
    key: fs.readFileSync("./key.pem", "utf8"),
    // array of above
    key: [Bun.file("./key1.pem"), Bun.file("./key2.pem")],
  },
});
如果您的私密金鑰使用密碼加密,請提供 passphrase 的值以解密。
Bun.serve({
  fetch(req) {
    return new Response("Hello!!!");
  },

  tls: {
    key: Bun.file("./key.pem"),
    cert: Bun.file("./cert.pem"),
    passphrase: "my-secret-passphrase",
  }
});
您可以選擇性地傳入 ca 的值來覆寫信任的 CA 憑證。預設情況下,伺服器將信任 Mozilla 管理的知名 CA 清單。當指定 ca 時,Mozilla 清單會被覆寫。
Bun.serve({
  fetch(req) {
    return new Response("Hello!!!");
  },
  tls: {
    key: Bun.file("./key.pem"), // path to TLS key
    cert: Bun.file("./cert.pem"), // path to TLS cert
    ca: Bun.file("./ca.pem"), // path to root CA certificate
  }
});
若要覆寫 Diffie-Hellman 參數
Bun.serve({
  // ...
  tls: {
    // other config
    dhParamsFile: "/path/to/dhparams.pem", // path to Diffie Hellman parameters
  },
});
伺服器名稱指示 (SNI)
若要設定伺服器的伺服器名稱指示 (SNI),請在 tls 物件中設定 serverName 欄位。
Bun.serve({
  // ...
  tls: {
    // ... other config
    serverName: "my-server.com", // SNI
  },
});
若要允許多個伺服器名稱,請將物件陣列傳遞給 tls,每個物件都包含 serverName 欄位。
Bun.serve({
  // ...
  tls: [
    {
      key: Bun.file("./key1.pem"),
      cert: Bun.file("./cert1.pem"),
      serverName: "my-server1.com",
    },
    {
      key: Bun.file("./key2.pem"),
      cert: Bun.file("./cert2.pem"),
      serverName: "my-server2.com",
    },
  ],
});
idleTimeout
若要設定閒置逾時,請在 Bun.serve 中設定 idleTimeout 欄位。
Bun.serve({
  // 10 seconds:
  idleTimeout: 10,

  fetch(req) {
    return new Response("Bun!");
  },
});
這是伺服器關閉連線前,允許連線閒置的最長時間。如果沒有傳送或接收任何資料,連線即為閒置。
export default 語法
到目前為止,本頁面上的範例都使用了明確的 Bun.serve API。Bun 也支援另一種語法。
import {type Serve} from "bun";

export default {
  fetch(req) {
    return new Response("Bun!");
  },
} satisfies Serve;
您可以選擇 export default 伺服器選項,而不是將其傳遞到 Bun.serve 中。此檔案可以直接執行;當 Bun 看到具有包含 fetch 處理常式之 default 導出的檔案時,會在底層將其傳遞到 Bun.serve 中。
串流檔案
若要串流檔案,請傳回以 BunFile 物件作為主體的 Response 物件。
Bun.serve({
  fetch(req) {
    return new Response(Bun.file("./hello.txt"));
  },
});
⚡️ 速度 — Bun 會在可能的情況下自動使用 sendfile(2) 系統呼叫,在核心中啟用零複製檔案傳輸 — 這是傳送檔案的最快方式。
您可以使用 Bun.file 物件上的 slice(start, end) 方法來傳送檔案的一部分。這會自動在 Response 物件上設定 Content-Range 和 Content-Length 標頭。
Bun.serve({
  fetch(req) {
    // parse `Range` header
    const [start = 0, end = Infinity] = req.headers
      .get("Range") // Range: bytes=0-100
      .split("=") // ["Range: bytes", "0-100"]
      .at(-1) // "0-100"
      .split("-") // ["0", "100"]
      .map(Number); // [0, 100]

    // return a slice of the file
    const bigFile = Bun.file("./big-video.mp4");
    return new Response(bigFile.slice(start, end));
  },
});
伺服器生命週期方法
server.stop() - 停止伺服器
停止伺服器接受新連線
const server = Bun.serve({
  fetch(req) {
    return new Response("Hello!");
  },
});

// Gracefully stop the server (waits for in-flight requests)
await server.stop();

// Force stop and close all active connections
await server.stop(true);
預設情況下,stop() 允許進行中的請求和 WebSocket 連線完成。傳遞 true 以立即終止所有連線。
server.ref() 和 server.unref() - 程序生命週期控制
控制伺服器是否保持 Bun 程序運作
// Don't keep process alive if server is the only thing running
server.unref();

// Restore default behavior - keep process alive
server.ref();
server.reload() - 熱重新載入處理常式
更新伺服器的處理常式,而無需重新啟動
const server = Bun.serve({
  routes: {
    "/api/version": Response.json({ version: "v1" }),
  },
  fetch(req) {
    return new Response("v1");
  },
});

// Update to new handler
server.reload({
  routes: {
    "/api/version": Response.json({ version: "v2" }),
  },
  fetch(req) {
    return new Response("v2");
  },
});
這對於開發和熱重新載入很有用。只有 fetch、error 和 routes 可以更新。
單次請求控制
server.timeout(Request, seconds) - 自訂請求逾時
為個別請求設定自訂閒置逾時
const server = Bun.serve({
  fetch(req, server) {
    // Set 60 second timeout for this request
    server.timeout(req, 60);

    // If they take longer than 60 seconds to send the body, the request will be aborted
    await req.text();

    return new Response("Done!");
  },
});
傳遞 0 以停用請求的逾時。
server.requestIP(Request) - 取得用戶端資訊
取得用戶端 IP 和埠號資訊
const server = Bun.serve({
  fetch(req, server) {
    const address = server.requestIP(req);
    if (address) {
      return new Response(
        `Client IP: ${address.address}, Port: ${address.port}`,
      );
    }
    return new Response("Unknown client");
  },
});
對於已關閉的請求或 Unix 網域通訊端,傳回 null。
伺服器指標
server.pendingRequests 和 server.pendingWebSockets
使用內建計數器監控伺服器活動
const server = Bun.serve({
  fetch(req, server) {
    return new Response(
      `Active requests: ${server.pendingRequests}\n` +
        `Active WebSockets: ${server.pendingWebSockets}`,
    );
  },
});
server.subscriberCount(topic) - WebSocket 訂閱者
取得 WebSocket 主題的訂閱者計數
const server = Bun.serve({
  fetch(req, server) {
    const chatUsers = server.subscriberCount("chat");
    return new Response(`${chatUsers} users in chat`);
  },
  websocket: {
    message(ws) {
      ws.subscribe("chat");
    },
  },
});
WebSocket 設定
server.publish(topic, data, compress) - WebSocket 訊息發佈
伺服器可以將訊息發佈到所有訂閱特定主題的 WebSocket 用戶端
const server = Bun.serve({
  websocket: {
    message(ws) {
      // Publish to all "chat" subscribers
      server.publish("chat", "Hello everyone!");
    },
  },

  fetch(req) {
    // ...
  },
});
publish() 方法傳回
- 成功時傳送的位元組數
- 如果訊息被丟棄,則為
0 - 如果套用了背壓,則為
-1
WebSocket 處理常式選項
設定 WebSockets 時,可以透過 websocket 處理常式使用多個進階選項
Bun.serve({
  websocket: {
    // Maximum message size (in bytes)
    maxPayloadLength: 64 * 1024,

    // Backpressure limit before messages are dropped
    backpressureLimit: 1024 * 1024,

    // Close connection if backpressure limit is hit
    closeOnBackpressureLimit: true,

    // Handler called when backpressure is relieved
    drain(ws) {
      console.log("Backpressure relieved");
    },

    // Enable per-message deflate compression
    perMessageDeflate: {
      compress: true,
      decompress: true,
    },

    // Send ping frames to keep connection alive
    sendPings: true,

    // Handlers for ping/pong frames
    ping(ws, data) {
      console.log("Received ping");
    },
    pong(ws, data) {
      console.log("Received pong");
    },

    // Whether server receives its own published messages
    publishToSelf: false,
  },
});
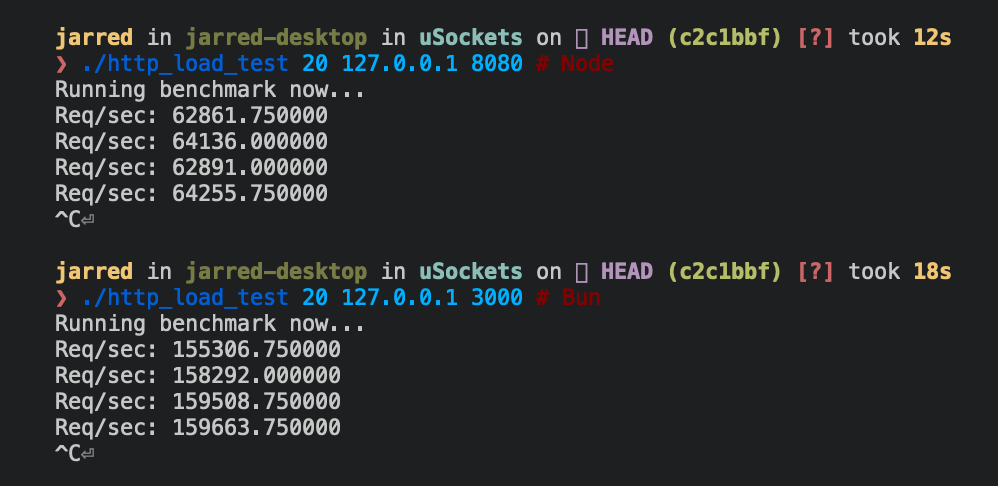
效能基準
以下是 Bun 和 Node.js 實作的簡單 HTTP 伺服器,該伺服器會對每個傳入的 Request 回應 Bun!。
Bun.serve({
  fetch(req: Request) {
    return new Response("Bun!");
  },
  port: 3000,
});
require("http")
  .createServer((req, res) => res.end("Bun!"))
  .listen(8080);
Bun.serve 伺服器在 Linux 上每秒大約可以處理比 Node.js 多 2.5 倍的請求。
| 執行階段 | 每秒請求數 |
|---|---|
| Node 16 | ~64,000 |
| Bun | ~160,000 |
參考
請參閱 TypeScript 定義