


Bun 快速的原生打包器現已進入 beta 測試階段。它可以使用 bun build CLI 命令或 Bun.build() JavaScript API 來使用。
await Bun.build({
  entrypoints: ['./index.tsx'],
  outdir: './build',
});
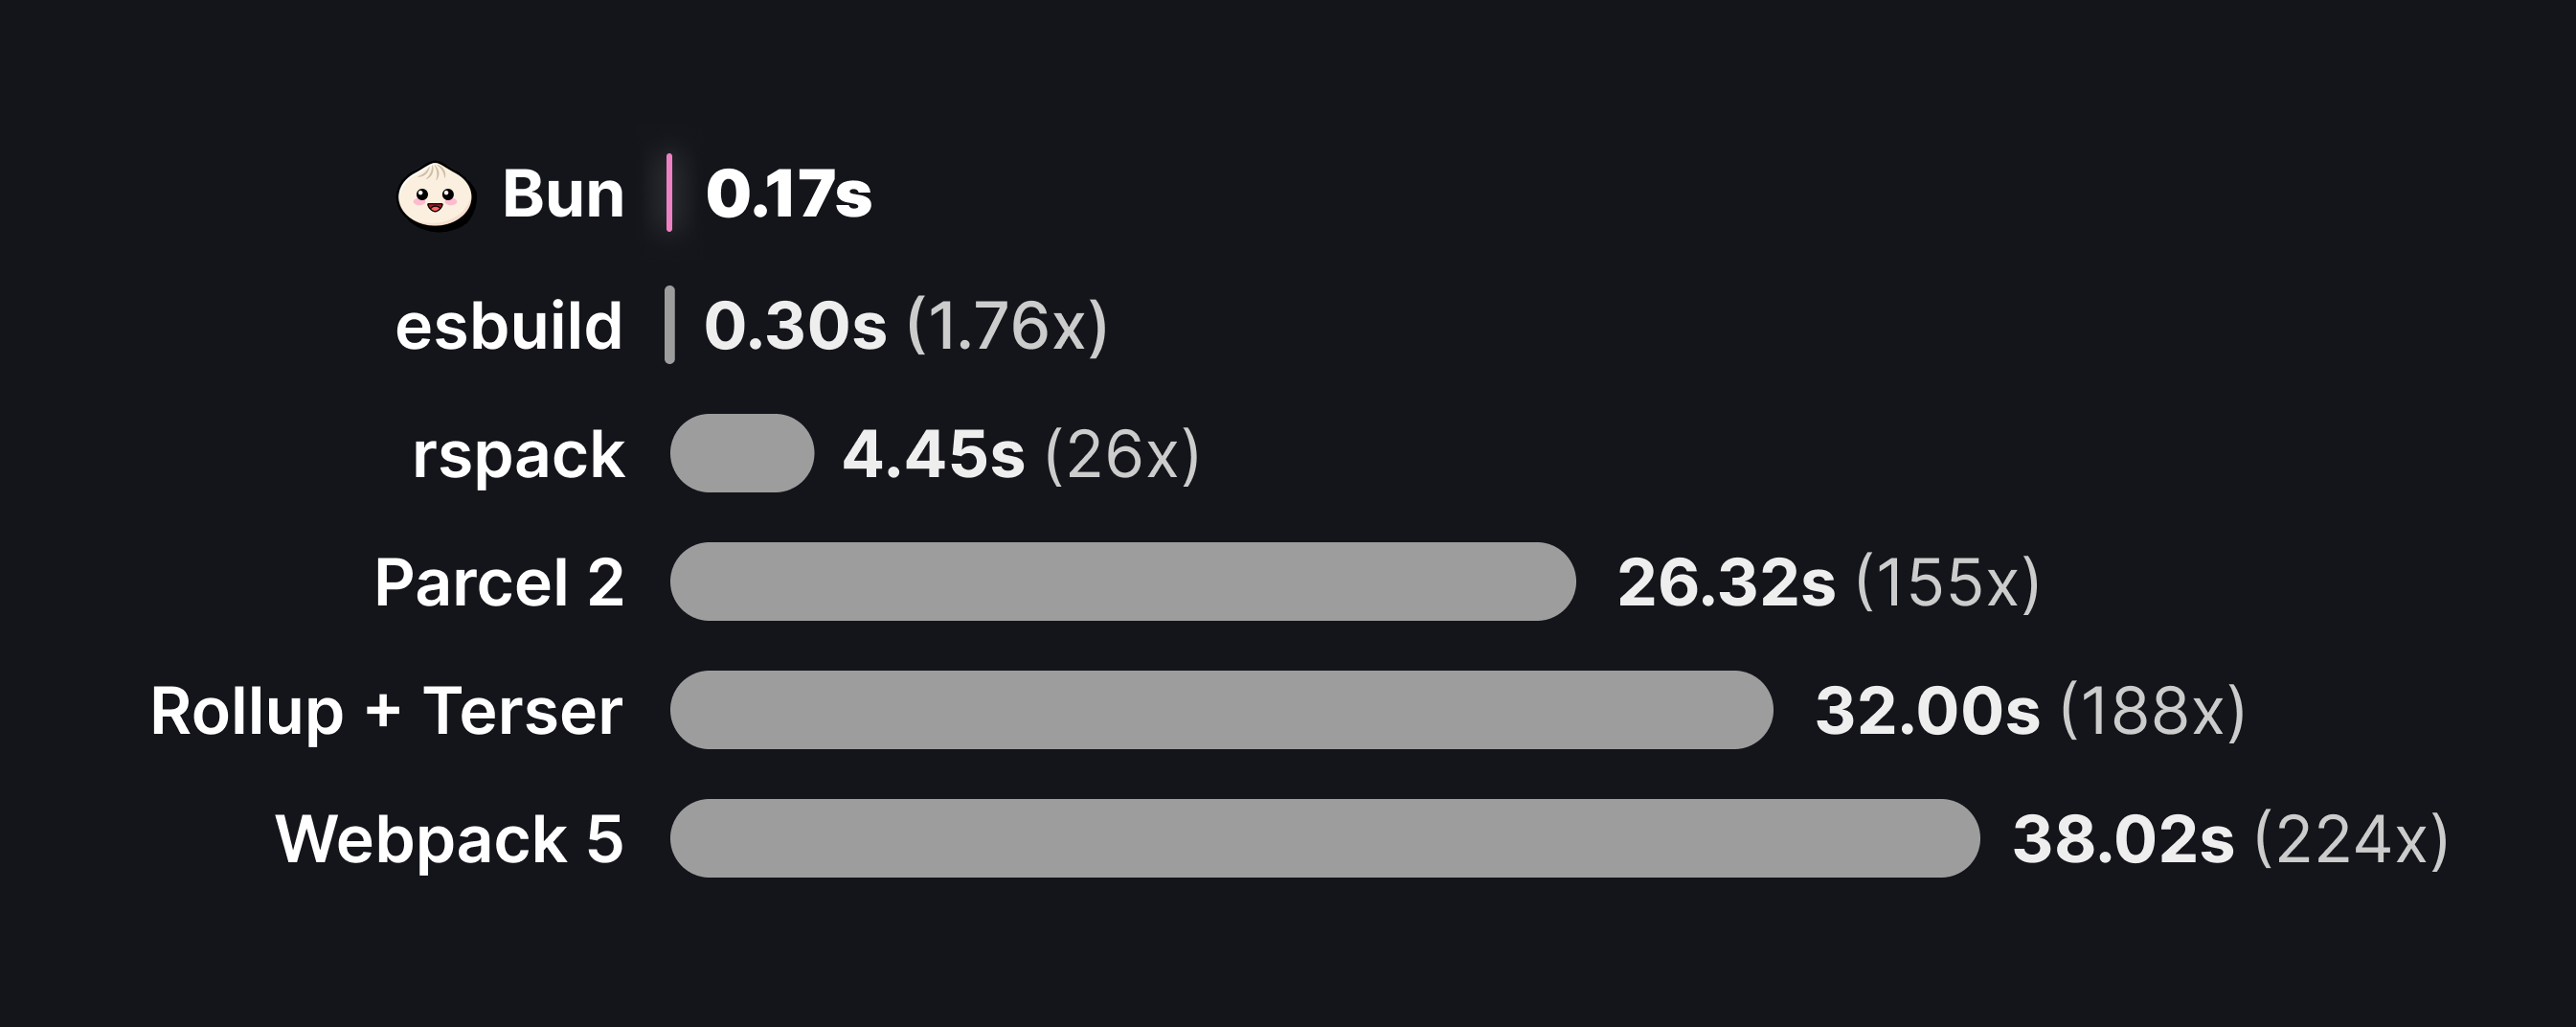
bun build ./index.tsx --outdir ./build速度很快。以下數字代表 esbuild three.js 基準測試的效能。
為什麼要打包?
打包器是 JavaScript 生態系統中重要的基礎設施。簡要概述一下為什麼打包如此重要
- 減少 HTTP 請求。
node_modules中的單個套件可能包含數百個檔案,而大型應用程式可能有數十個此類依賴項。使用單獨的 HTTP 請求載入每個檔案很快就會變得難以維護,因此使用打包器將我們的應用程式原始碼轉換為少量可以通過單個請求載入的自包含「bundles」。 - 程式碼轉換。 現代應用程式通常使用 TypeScript、JSX 和 CSS modules 等語言或工具構建,所有這些都必須轉換為純 JavaScript 和 CSS 才能被瀏覽器使用。打包器是用於配置這些轉換的自然位置。
- 框架功能。 框架依賴打包器外掛程式和程式碼轉換來實現常見模式,例如檔案系統路由、客戶端-伺服器程式碼共置(例如
getServerSideProps或 Remix loaders)和伺服器組件。
讓我們深入了解打包器 API。
請注意,Bun 打包器並非旨在取代 tsc 進行類型檢查或產生類型宣告。
基本範例
讓我們建置我們的第一個 bundle。您有以下兩個檔案,它們實作了一個簡單的客戶端渲染 React 應用程式。
import * as ReactDOM from 'react-dom/client';
import {Component} from "./Component"

const root = ReactDOM.createRoot(document.getElementById('root')!);
root.render(<Component message="Sup!" />)
export function Component(props: {message: string}) {
  return <p>{props.message}</p>
}
在這裡,index.tsx 是我們應用程式的「進入點」。通常,這會是一個執行某些*副作用*的腳本,例如啟動伺服器,或者在本例中是初始化 React root。因為我們正在使用 TypeScript 和 JSX,所以我們需要在將程式碼發送到瀏覽器之前對其進行打包。
建立我們的 bundle
await Bun.build({
  entrypoints: ['./index.tsx'],
  outdir: './out',
})
bun build ./index.tsx --outdir ./out對於 entrypoints 中指定的每個檔案,Bun 都會產生一個新的 bundle。此 bundle 將寫入到 ./out 目錄(從當前工作目錄解析)。執行建置後,檔案系統看起來像這樣
.
├── index.tsx
├── Component.tsx
└── out
    └── index.js
out/index.js 的內容看起來會像這樣
// ...
// ~20k lines of code
// including the contents of `react-dom/client` and all its dependencies
// this is where the $jsxDEV and $createRoot functions are defined


// Component.tsx
function Component(props) {
  return $jsxDEV("p", {
    children: props.message
  }, undefined, false, undefined, this);
}

// index.tsx
var rootNode = document.getElementById("root");
var root = $createRoot(rootNode);
root.render($jsxDEV(Component, {
  message: "Sup!"
}, undefined, false, undefined, this));
教學:在您的瀏覽器中執行此檔案
監看模式
與運行時和測試執行器一樣,打包器原生支援監看模式。
bun build ./index.tsx --outdir ./out --watch內容類型
與 Bun 運行時一樣,打包器開箱即用支援多種檔案類型。下表細分了打包器的一組標準「loaders」。有關完整文檔,請參閱 Bundler > 檔案類型。
| 副檔名 | 詳細資訊 |
|---|---|
.js .jsx, .cjs .mjs .mts .cts .ts .tsx | 使用 Bun 的內建轉譯器來解析檔案,並將 TypeScript/JSX 語法轉譯為原生 JavaScript。打包器執行一組預設轉換,包括死碼消除和 tree shaking。目前 Bun 不嘗試向下轉換語法;如果您使用最新的 ECMAScript 語法,則會反映在打包的程式碼中。 |
| JSON 檔案被解析並作為 JavaScript 物件內聯到 bundle 中。 |
| TOML 檔案被解析並作為 JavaScript 物件內聯到 bundle 中。 |
| 文字檔案的內容被讀取並作為字串內聯到 bundle 中。 |
.node .wasm | Bun 運行時支援這些檔案,但在打包期間,它們被視為 資源。 |
資源
如果打包器遇到具有無法識別副檔名的 import,它會將導入的檔案視為*外部檔案*。引用的檔案會按原樣複製到 outdir 中,並且 import 會解析為檔案的*路徑*。
// bundle entrypoint
import logo from "./logo.svg";
console.log(logo);
// bundled output
var logo = "./logo-ab237dfe.svg";
console.log(logo);
檔案 loader 的確切行為也受到 naming 和 publicPath 的影響。
有關檔案 loader 的更完整文檔,請參閱 Bundler > Loaders 頁面。
外掛程式
此表格中描述的行為可以通過外掛程式覆蓋或擴展。有關完整文檔,請參閱 Bundler > Loaders 頁面。
API
entrypoints
必填。 對應於應用程式進入點的路徑陣列。每個進入點將產生一個 bundle。
const result = await Bun.build({
  entrypoints: ["./index.ts"],
});
// => { success: boolean, outputs: BuildArtifact[], logs: BuildMessage[] }
bun build --entrypoints ./index.ts# the bundle will be printed to stdout
# <bundled code>outdir
將在其中寫入輸出檔案的目錄。
const result = await Bun.build({
  entrypoints: ['./index.ts'],
  outdir: './out'
});
// => { success: boolean, outputs: BuildArtifact[], logs: BuildMessage[] }
bun build --entrypoints ./index.ts --outdir ./out# a summary of bundled files will be printed to stdout如果 outdir 未傳遞給 JavaScript API,則打包的程式碼將不會寫入磁碟。打包的檔案將以 BuildArtifact 物件陣列的形式返回。這些物件是具有額外屬性的 Blobs;有關完整文檔,請參閱 Outputs。
const result = await Bun.build({
  entrypoints: ["./index.ts"],
});

for (const res of result.outputs) {
  // Can be consumed as blobs
  await res.text();

  // Bun will set Content-Type and Etag headers
  new Response(res);

  // Can be written manually, but you should use `outdir` in this case.
  Bun.write(path.join("out", res.path), res);
}
當設定 outdir 時,BuildArtifact 上的 path 屬性將是寫入位置的絕對路徑。
target
bundle 的預期執行環境。
await Bun.build({
  entrypoints: ['./index.ts'],
  outdir: './out',
  target: 'browser', // default
})
bun build --entrypoints ./index.ts --outdir ./out --target browser根據目標,Bun 將應用不同的模組解析規則和優化。
browser | 預設值。 用於產生旨在由瀏覽器執行的 bundles。在解析 import 時,優先考慮 "browser" 導出條件。導入任何內建模組(如 node:events 或 node:path)都可以正常運作,但調用某些函數(如 fs.readFile)將無法運作。 |
| 用於產生旨在由 Bun 運行時運行的 bundles。在許多情況下,沒有必要打包伺服器端程式碼;您可以直接執行原始碼而無需修改。但是,打包您的伺服器程式碼可以減少啟動時間並提高運行效能。 所有使用 如果任何進入點包含 Bun shebang ( 當一起使用 |
node | 用於產生旨在由 Node.js 運行的 bundles。在解析 import 時,優先考慮 "node" 導出條件,並輸出 .mjs。將來,這將自動 polyfill Bun 全域變數和其他內建 bun:* 模組,儘管尚未實作。 |
format
指定要在產生的 bundles 中使用的模組格式。
Bun 預設為 "esm",並為 "cjs" 和 "iife" 提供實驗性支援。
format: "esm" - ES Module
這是預設格式,它支援 ES Module 語法,包括頂層 await、import.meta 等。
await Bun.build({
  entrypoints: ['./index.tsx'],
  outdir: './out',
  format: "esm",
})
bun build ./index.tsx --outdir ./out --format esm若要在瀏覽器中使用 ES Module 語法,請將 format 設定為 "esm",並確保您的 <script type="module"> 標籤已設定 type="module"。
format: "cjs" - CommonJS
若要建置 CommonJS 模組,請將 format 設定為 "cjs"。當選擇 "cjs" 時,預設目標從 "browser" (esm) 變更為 "node" (cjs)。使用 format: "cjs", target: "node" 轉譯的 CommonJS 模組可以在 Bun 和 Node.js 中執行(假設使用的 API 都支援)。
await Bun.build({
  entrypoints: ['./index.tsx'],
  outdir: './out',
  format: "cjs",
})
bun build ./index.tsx --outdir ./out --format cjsformat: "iife" - IIFE
待辦事項:在我們支援 globalNames 後記錄 IIFE。
splitting
是否啟用程式碼分割。
await Bun.build({
  entrypoints: ['./index.tsx'],
  outdir: './out',
  splitting: false, // default
})
bun build ./index.tsx --outdir ./out --splitting當為 true 時,打包器將啟用*程式碼分割*。當多個進入點都導入相同的檔案、模組或一組檔案/模組時,將共享程式碼分割到單獨的 bundle 中通常很有用。此共享 bundle 稱為 *chunk*。考慮以下檔案
import { shared } from './shared.ts';
import { shared } from './shared.ts';
export const shared = 'shared';
若要啟用程式碼分割來打包 entry-a.ts 和 entry-b.ts
await Bun.build({
  entrypoints: ['./entry-a.ts', './entry-b.ts'],
  outdir: './out',
  splitting: true,
})
bun build ./entry-a.ts ./entry-b.ts --outdir ./out --splitting執行此建置將產生以下檔案
.
├── entry-a.tsx
├── entry-b.tsx
├── shared.tsx
└── out
    ├── entry-a.js
    ├── entry-b.js
    └── chunk-2fce6291bf86559d.js
產生的 chunk-2fce6291bf86559d.js 檔案包含共享程式碼。為了避免衝突,預設情況下檔案名稱會自動包含內容雜湊。這可以使用 naming 進行自訂。
plugins
在打包期間使用的外掛程式列表。
await Bun.build({
  entrypoints: ['./index.tsx'],
  outdir: './out',
  plugins: [/* ... */],
})
n/a
Bun 為 Bun 運行時和打包器實作了通用的外掛程式系統。有關完整文檔,請參閱外掛程式文檔。
env
控制在打包期間如何處理環境變數。在內部,這使用 define 將環境變數注入到 bundle 中,但可以更輕鬆地指定要注入的環境變數。
env: "inline"
通過將 process.env.FOO 引用轉換為包含實際環境變數值的字串文字,將環境變數注入到打包的輸出中。
await Bun.build({
  entrypoints: ['./index.tsx'],
  outdir: './out',
  env: "inline",
})
FOO=bar BAZ=123 bun build ./index.tsx --outdir ./out --env inline對於以下輸入
console.log(process.env.FOO);
console.log(process.env.BAZ);
產生的 bundle 將包含以下程式碼
console.log("bar");
console.log("123");
env: "PUBLIC_*" (前綴)
內聯與給定前綴(* 字元之前的部分)匹配的環境變數,將 process.env.FOO 替換為實際的環境變數值。這對於選擇性地內聯環境變數非常有用,例如面向公眾的 URL 或客戶端 token,而無需擔心將私有憑證注入到輸出 bundle 中。
await Bun.build({
  entrypoints: ['./index.tsx'],
  outdir: './out',

  // Inline all env vars that start with "ACME_PUBLIC_"
  env: "ACME_PUBLIC_*",
})
FOO=bar BAZ=123 ACME_PUBLIC_URL=https://acme.com bun build ./index.tsx --outdir ./out --env 'ACME_PUBLIC_*'例如,給定以下環境變數
FOO=bar BAZ=123 ACME_PUBLIC_URL=https://acme.com以及原始碼
console.log(process.env.FOO);
console.log(process.env.ACME_PUBLIC_URL);
console.log(process.env.BAZ);
產生的 bundle 將包含以下程式碼
console.log(process.env.FOO);
console.log("https://acme.com");
console.log(process.env.BAZ);
env: "disable"
完全禁用環境變數注入。
例如,給定以下環境變數
FOO=bar BAZ=123 ACME_PUBLIC_URL=https://acme.com以及原始碼
console.log(process.env.FOO);
console.log(process.env.ACME_PUBLIC_URL);
console.log(process.env.BAZ);
產生的 bundle 將包含以下程式碼
console.log(process.env.FOO);
console.log(process.env.BAZ);
sourcemap
指定要產生的 sourcemap 類型。
await Bun.build({
  entrypoints: ['./index.tsx'],
  outdir: './out',
  sourcemap: 'linked', // default 'none'
})
bun build ./index.tsx --outdir ./out --sourcemap=linked"none" | 預設值。 不產生 sourcemap。 |
| 在每個 |
"external" | 在每個 *.js bundle 旁邊創建一個單獨的 *.js.map 檔案,但不插入 //# sourceMappingURL 注釋。 |
產生的 bundles 包含一個 debug id,可用於將 bundle 與其對應的 sourcemap 關聯起來。此 debugId 作為註解添加到檔案底部。
// <generated bundle code>

//# debugId=<DEBUG ID>
"inline"產生一個 sourcemap,並作為 base64 payload 附加到產生的 bundle 的末尾。
// <bundled code here>

//# sourceMappingURL=data:application/json;base64,<encoded sourcemap here>
相關聯的
*.js.mapsourcemap 將是一個 JSON 檔案,其中包含等效的debugId屬性。
minify
是否啟用最小化。預設值 false。
當目標為 bun 時,預設情況下會最小化識別碼。
啟用所有最小化選項
await Bun.build({
  entrypoints: ['./index.tsx'],
  outdir: './out',
  minify: true, // default false
})
bun build ./index.tsx --outdir ./out --minify粒度化地啟用某些最小化
await Bun.build({
  entrypoints: ['./index.tsx'],
  outdir: './out',
  minify: {
    whitespace: true,
    identifiers: true,
    syntax: true,
  },
})
bun build ./index.tsx --outdir ./out --minify-whitespace --minify-identifiers --minify-syntaxexternal
要視為*外部*的 import 路徑列表。預設值為 []。
await Bun.build({
  entrypoints: ['./index.tsx'],
  outdir: './out',
  external: ["lodash", "react"], // default: []
})
bun build ./index.tsx --outdir ./out --external lodash --external react外部 import 是指不會包含在最終 bundle 中的 import。相反,import 語句將保持原樣,以便在運行時解析。
例如,考慮以下進入點檔案
import _ from "lodash";
import {z} from "zod";

const value = z.string().parse("Hello world!")
console.log(_.upperCase(value));
通常,打包 index.tsx 會產生一個 bundle,其中包含 "zod" 套件的整個原始碼。相反,如果我們想保持 import 語句原樣,我們可以將其標記為外部
await Bun.build({
  entrypoints: ['./index.tsx'],
  outdir: './out',
  external: ['zod'],
})
bun build ./index.tsx --outdir ./out --external zod產生的 bundle 看起來會像這樣
import {z} from "zod";

// ...
// the contents of the "lodash" package
// including the `_.upperCase` function

var value = z.string().parse("Hello world!")
console.log(_.upperCase(value));
若要將所有 import 標記為外部,請使用萬用字元 *
await Bun.build({
  entrypoints: ['./index.tsx'],
  outdir: './out',
  external: ['*'],
})
bun build ./index.tsx --outdir ./out --external '*'packages
控制是否將套件依賴項包含在 bundle 中。可能的值:bundle(預設值)、external。Bun 將任何路徑不以 .、.. 或 / 開頭的 import 視為套件。
await Bun.build({
  entrypoints: ['./index.ts'],
  packages: 'external',
})
bun build ./index.ts --packages externalnaming
自訂產生的檔案名稱。預設值為 ./[dir]/[name].[ext]。
await Bun.build({
  entrypoints: ['./index.tsx'],
  outdir: './out',
  naming: "[dir]/[name].[ext]", // default
})
bun build ./index.tsx --outdir ./out --entry-naming [dir]/[name].[ext]預設情況下,產生的 bundles 的名稱基於相關聯的進入點的名稱。
.
├── index.tsx
└── out
    └── index.js
對於多個進入點,產生的檔案層級結構將反映進入點的目錄結構。
.
├── index.tsx
└── nested
    └── index.tsx
└── out
    ├── index.js
    └── nested
        └── index.js
可以使用 naming 欄位自訂產生的檔案的名稱和位置。此欄位接受一個模板字串,用於產生與進入點相對應的所有 bundles 的檔案名稱。其中以下 token 將被替換為其對應的值
[name]- 進入點檔案的名稱,不包含副檔名。[ext]- 產生的 bundle 的副檔名。[hash]- bundle 內容的雜湊值。[dir]- 從專案根目錄到原始檔父目錄的相對路徑。
例如
| Token | [name] | [ext] | [hash] | [dir] |
|---|---|---|---|---|
./index.tsx | index | js | a1b2c3d4 | "" (空字串) |
./nested/entry.ts | entry | js | c3d4e5f6 | "nested" |
我們可以組合這些 token 來建立模板字串。例如,若要在產生的 bundle 名稱中包含雜湊值
await Bun.build({
  entrypoints: ['./index.tsx'],
  outdir: './out',
  naming: 'files/[dir]/[name]-[hash].[ext]',
})
bun build ./index.tsx --outdir ./out --entry-naming [name]-[hash].[ext]此建置將產生以下檔案結構
.
├── index.tsx
└── out
    └── files
        └── index-a1b2c3d4.js
當為 naming 欄位提供 string 時,它僅用於*與進入點相對應的* bundles。chunks 和複製資源的名稱不受影響。使用 JavaScript API,可以為每種類型的產生檔案指定單獨的模板字串。
await Bun.build({
  entrypoints: ['./index.tsx'],
  outdir: './out',
  naming: {
    // default values
    entry: '[dir]/[name].[ext]',
    chunk: '[name]-[hash].[ext]',
    asset: '[name]-[hash].[ext]',
  },
})
bun build ./index.tsx --outdir ./out --entry-naming "[dir]/[name].[ext]" --chunk-naming "[name]-[hash].[ext]" --asset-naming "[name]-[hash].[ext]"root
專案的根目錄。
await Bun.build({
  entrypoints: ['./pages/a.tsx', './pages/b.tsx'],
  outdir: './out',
  root: '.',
})
n/a
如果未指定,則會計算為所有進入點檔案的第一個共同祖先目錄。考慮以下檔案結構
.
└── pages
  └── index.tsx
  └── settings.tsx
我們可以在 pages 目錄中建置兩個進入點
await Bun.build({
  entrypoints: ['./pages/index.tsx', './pages/settings.tsx'],
  outdir: './out',
})
bun build ./pages/index.tsx ./pages/settings.tsx --outdir ./out這將產生如下的檔案結構
.
└── pages
  └── index.tsx
  └── settings.tsx
└── out
  └── index.js
  └── settings.js
由於 pages 目錄是進入點檔案的第一個共同祖先目錄,因此它被視為專案根目錄。這表示產生的 bundles 位於 out 目錄的頂層;沒有 out/pages 目錄。
可以通過指定 root 選項來覆蓋此行為
await Bun.build({
  entrypoints: ['./pages/index.tsx', './pages/settings.tsx'],
  outdir: './out',
  root: '.',
})
bun build ./pages/index.tsx ./pages/settings.tsx --outdir ./out --root .通過將 . 指定為 root,產生的檔案結構將如下所示
.
└── pages
  └── index.tsx
  └── settings.tsx
└── out
  └── pages
    └── index.js
    └── settings.js
publicPath
要附加到打包程式碼中任何 import 路徑的前綴。
在許多情況下,產生的 bundles 將不包含 import 語句。畢竟,打包的目標是將所有程式碼組合到單個檔案中。但是,在許多情況下,產生的 bundles 將包含 import 語句。
- 資源 import — 當導入無法識別的檔案類型(如
*.svg)時,打包器會延遲到檔案 loader,後者將檔案按原樣複製到outdir中。import 將轉換為變數 - 外部模組 — 檔案和模組可以標記為外部,在這種情況下,它們將不會包含在 bundle 中。相反,
import語句將保留在最終 bundle 中。 - Chunking(分塊)。當啟用 splitting 時,打包器可能會產生單獨的「chunk」檔案,這些檔案代表多個進入點之間共享的程式碼。
在任何這些情況下,最終的 bundles 可能包含指向其他檔案的路徑。預設情況下,這些 import 是*相對的*。這是一個簡單的資源 import 的範例
import logo from './logo.svg';
console.log(logo);
// logo.svg is copied into <outdir>
// and hash is added to the filename to prevent collisions
var logo = './logo-a7305bdef.svg';
console.log(logo);
設定 publicPath 將使用指定的值為所有檔案路徑添加前綴。
await Bun.build({
  entrypoints: ['./index.tsx'],
  outdir: './out',
  publicPath: 'https://cdn.example.com/', // default is undefined
})
bun build ./index.tsx --outdir ./out --public-path https://cdn.example.com/輸出檔案現在看起來會像這樣。
var logo = './logo-a7305bdef.svg';
var logo = 'https://cdn.example.com/logo-a7305bdef.svg';
define
在建置時要替換的全域識別碼的映射。此物件的 keys 是識別碼名稱,values 是將被內聯的 JSON 字串。
await Bun.build({
  entrypoints: ['./index.tsx'],
  outdir: './out',
  define: {
    STRING: JSON.stringify("value"),
    "nested.boolean": "true",
  },
})
bun build ./index.tsx --outdir ./out --define 'STRING="value"' --define "nested.boolean=true"loader
檔案副檔名到內建 loader 名稱的映射。這可用於快速自訂特定檔案的載入方式。
await Bun.build({
  entrypoints: ['./index.tsx'],
  outdir: './out',
  loader: {
    ".png": "dataurl",
    ".txt": "file",
  },
})
bun build ./index.tsx --outdir ./out --loader .png:dataurl --loader .txt:filebanner
要添加到最終 bundle 的橫幅,這可以是 react 的 "use client" 指令,也可以是註解塊,例如程式碼的授權條款。
await Bun.build({
  entrypoints: ['./index.tsx'],
  outdir: './out',
  banner: '"use client";'
})
bun build ./index.tsx --outdir ./out --banner "\"use client\";"footer
要添加到最終 bundle 的頁尾,這可以是註解塊,例如授權條款,或者只是一個有趣的彩蛋。
await Bun.build({
  entrypoints: ['./index.tsx'],
  outdir: './out',
  footer: '// built with love in SF'
})
bun build ./index.tsx --outdir ./out --footer="// built with love in SF"drop
從 bundle 中移除函數調用。例如,--drop=console 將移除所有對 console.log 的調用。調用的參數也將被移除,無論這些參數是否可能具有副作用。移除 debugger 將移除所有 debugger 語句。
await Bun.build({
  entrypoints: ['./index.tsx'],
  outdir: './out',
  drop: ["console", "debugger", "anyIdentifier.or.propertyAccess"],
})
bun build ./index.tsx --outdir ./out --drop=console --drop=debugger --drop=anyIdentifier.or.propertyAccessOutputs
Bun.build 函數返回 Promise<BuildOutput>,定義為
interface BuildOutput {
  outputs: BuildArtifact[];
  success: boolean;
  logs: Array<object>; // see docs for details
}

interface BuildArtifact extends Blob {
  kind: "entry-point" | "chunk" | "asset" | "sourcemap";
  path: string;
  loader: Loader;
  hash: string | null;
  sourcemap: BuildArtifact | null;
}
outputs 陣列包含建置產生的所有檔案。每個 artifact 都實作了 Blob 介面。
const build = await Bun.build({
  /* */
});

for (const output of build.outputs) {
  await output.arrayBuffer(); // => ArrayBuffer
  await output.bytes(); // => Uint8Array
  await output.text(); // string
}
每個 artifact 還包含以下屬性
kind | 此檔案是哪種類型的建置輸出。建置會產生打包的進入點、程式碼分割的「chunks」、sourcemaps、bytecode 和複製的資源(如圖像)。 |
path | 磁碟上檔案的絕對路徑 |
載入器 (loader) | 此載入器用於解析檔案。請參閱 Bundler > Loaders 以了解 Bun 如何將檔案副檔名對應到適當的內建載入器。 |
雜湊值 (hash) | 檔案內容的雜湊值。永遠為 assets 定義。 |
原始碼地圖 (sourcemap) | 對應此檔案的原始碼地圖檔(如果已產生)。僅為 entrypoints 和 chunks 定義。 |
與 BunFile 類似,BuildArtifact 物件可以直接傳遞到 new Response() 中。
const build = await Bun.build({
  /* */
});

const artifact = build.outputs[0];

// Content-Type header is automatically set
return new Response(artifact);
Bun 執行時環境實作了 BuildArtifact 物件的特殊美化列印,以方便除錯。
// build.ts
const build = await Bun.build({/* */});

const artifact = build.outputs[0];
console.log(artifact);
bun run build.tsBuildArtifact (entry-point) {
path: "./index.js",
loader: "tsx",
kind: "entry-point",
hash: "824a039620219640",
Blob (114 bytes) {
type: "text/javascript;charset=utf-8"
},
sourcemap: null
}位元組碼 (Bytecode)
bytecode: boolean 選項可用於為任何 JavaScript/TypeScript entrypoints 產生位元組碼。這可以大幅縮短大型應用程式的啟動時間。僅支援 "cjs" 格式,僅支援 "target": "bun",且依賴於相符的 Bun 版本。這會為每個 entrypoint 新增一個對應的 .jsc 檔案。
await Bun.build({
  entrypoints: ["./index.tsx"],
  outdir: "./out",
  bytecode: true,
})
bun build ./index.tsx --outdir ./out --bytecode可執行檔 (Executables)
Bun 支援將 JavaScript/TypeScript entrypoint 「編譯」成獨立的可執行檔。此可執行檔包含 Bun 二進制檔案的副本。
bun build ./cli.tsx --outfile mycli --compile./mycli請參閱 Bundler > Executables 以取得完整文件。
日誌和錯誤 (Logs and errors)
若建置失敗,Bun.build 會傳回一個 rejected promise,並帶有 AggregateError。這可以記錄到主控台以美化列印錯誤列表,或使用 try/catch 區塊以程式方式讀取。
try {
  const result = await Bun.build({
    entrypoints: ["./index.tsx"],
    outdir: "./out",
  });
} catch (e) {
  // TypeScript does not allow annotations on the catch clause
  const error = e as AggregateError;
  console.error("Build Failed");

  // Example: Using the built-in formatter
  console.error(error);

  // Example: Serializing the failure as a JSON string.
  console.error(JSON.stringify(error, null, 2));
}
大多數時候,不需要顯式的 try/catch,因為 Bun 會整齊地列印未捕獲的例外。只需在 Bun.build 呼叫上使用頂層 await 就足夠了。
error.errors 中的每個項目都是 BuildMessage 或 ResolveMessage(Error 的子類別)的實例,其中包含每個錯誤的詳細資訊。
class BuildMessage {
  name: string;
  position?: Position;
  message: string;
  level: "error" | "warning" | "info" | "debug" | "verbose";
}

class ResolveMessage extends BuildMessage {
  code: string;
  referrer: string;
  specifier: string;
  importKind: ImportKind;
}
若建置成功,傳回的物件會包含一個 logs 屬性,其中包含 bundler 警告和資訊訊息。
const result = await Bun.build({
  entrypoints: ["./index.tsx"],
  outdir: "./out",
});

if (result.logs.length > 0) {
  console.warn("Build succeeded with warnings:");
  for (const message of result.logs) {
    // Bun will pretty print the message object
    console.warn(message);
  }
}
參考 (Reference)
interface Bun {
  build(options: BuildOptions): Promise<BuildOutput>;
}

interface BuildConfig {
  entrypoints: string[]; // list of file path
  outdir?: string; // output directory
  target?: Target; // default: "browser"
  /**
   * Output module format. Top-level await is only supported for `"esm"`.
   *
   * Can be:
   * - `"esm"`
   * - `"cjs"` (**experimental**)
   * - `"iife"` (**experimental**)
   *
   * @default "esm"
   */
  format?: "esm" | "cjs" | "iife";
  naming?:
    | string
    | {
        chunk?: string;
        entry?: string;
        asset?: string;
      };
  root?: string; // project root
  splitting?: boolean; // default true, enable code splitting
  plugins?: BunPlugin[];
  external?: string[];
  packages?: "bundle" | "external";
  publicPath?: string;
  define?: Record<string, string>;
  loader?: { [k in string]: Loader };
  sourcemap?: "none" | "linked" | "inline" | "external" | "linked" | boolean; // default: "none", true -> "inline"
  /**
   * package.json `exports` conditions used when resolving imports
   *
   * Equivalent to `--conditions` in `bun build` or `bun run`.
   *
   * https://node.dev.org.tw/api/packages.html#exports
   */
  conditions?: Array<string> | string;

  /**
   * Controls how environment variables are handled during bundling.
   *
   * Can be one of:
   * - `"inline"`: Injects environment variables into the bundled output by converting `process.env.FOO`
   *   references to string literals containing the actual environment variable values
   * - `"disable"`: Disables environment variable injection entirely
   * - A string ending in `*`: Inlines environment variables that match the given prefix.
   *   For example, `"MY_PUBLIC_*"` will only include env vars starting with "MY_PUBLIC_"
   */
  env?: "inline" | "disable" | `${string}*`;
  minify?:
    | boolean
    | {
        whitespace?: boolean;
        syntax?: boolean;
        identifiers?: boolean;
      };
  /**
   * Ignore dead code elimination/tree-shaking annotations such as @__PURE__ and package.json
   * "sideEffects" fields. This should only be used as a temporary workaround for incorrect
   * annotations in libraries.
   */
  ignoreDCEAnnotations?: boolean;
  /**
   * Force emitting @__PURE__ annotations even if minify.whitespace is true.
   */
  emitDCEAnnotations?: boolean;

  /**
   * Generate bytecode for the output. This can dramatically improve cold
   * start times, but will make the final output larger and slightly increase
   * memory usage.
   *
   * Bytecode is currently only supported for CommonJS (`format: "cjs"`).
   *
   * Must be `target: "bun"`
   * @default false
   */
  bytecode?: boolean;
  /**
   * Add a banner to the bundled code such as "use client";
   */
  banner?: string;
  /**
   * Add a footer to the bundled code such as a comment block like
   *
   * `// made with bun!`
   */
  footer?: string;

  /**
   * Drop function calls to matching property accesses.
   */
  drop?: string[];

  /**
   * When set to `true`, the returned promise rejects with an AggregateError when a build failure happens.
   * When set to `false`, the `success` property of the returned object will be `false` when a build failure happens.
   *
   * This defaults to `false` in Bun 1.1 and will change to `true` in Bun 1.2
   * as most usage of `Bun.build` forgets to check for errors.
   */
  throw?: boolean;
}

interface BuildOutput {
  outputs: BuildArtifact[];
  success: boolean;
  logs: Array<BuildMessage | ResolveMessage>;
}

interface BuildArtifact extends Blob {
  path: string;
  loader: Loader;
  hash: string | null;
  kind: "entry-point" | "chunk" | "asset" | "sourcemap" | "bytecode";
  sourcemap: BuildArtifact | null;
}

type Loader =
  | "js"
  | "jsx"
  | "ts"
  | "tsx"
  | "json"
  | "toml"
  | "file"
  | "napi"
  | "wasm"
  | "text";

interface BuildOutput {
  outputs: BuildArtifact[];
  success: boolean;
  logs: Array<BuildMessage | ResolveMessage>;
}

declare class ResolveMessage {
  readonly name: "ResolveMessage";
  readonly position: Position | null;
  readonly code: string;
  readonly message: string;
  readonly referrer: string;
  readonly specifier: string;
  readonly importKind:
    | "entry_point"
    | "stmt"
    | "require"
    | "import"
    | "dynamic"
    | "require_resolve"
    | "at"
    | "at_conditional"
    | "url"
    | "internal";
  readonly level: "error" | "warning" | "info" | "debug" | "verbose";

  toString(): string;
}